-
Getting the Most from Your Dolly on Moving Day
Moving day is tough enough without having to deal with a thrown-out back and sore arms. Make things easier on yourself by visiting a rental equipment shop for a moving dolly or two. If you’re moving heavy items up or down stairs, choose a dolly with inflatable wheels. Solid wheels work well for rolling heavy items on even surfaces.
Moving the Dolly
It’s a good idea to wear a pair of sturdy work gloves and steel-toed safety shoes when moving heavy items with a dolly. Once you’ve loaded up the dolly, make sure there’s a clear path for it to travel. If it’s a two-wheeled dolly, grasp the handles and tip it back toward your body. At the same time, place a foot on the crossbar to help it move. Push the dolly to its destination—never try to pull it. When you’ve reached the moving van, put a foot on the crossbar while lowering the dolly.

Stacking Boxes
Only stack a few boxes at a time on your hand truck. The stack shouldn’t be so tall that you have trouble seeing over the top. Also, make sure the box on the top is resting against the vertical component of the dolly. Otherwise, it will slide backward when you move the dolly. Place the heaviest box on the bottom of the stack.
Loading Appliances
Moving appliances is far easier when you have a hand truck. Disconnect the appliance from its power source and slide it away from the wall. Pick up the cords and wires, and tape them to the appliance to keep them off the floor. Load the appliance onto the dolly with the rear of the appliance facing you and the dolly. This distributes the weight more evenly so it’s easier to move. It also minimizes the risk of scratching the face of the appliance. Remember to secure this heavy load with a strap !
There’s no need to purchase a dolly when you’ll only use it occasionally. Instead, head over to A Tool Shed, where we offer great deals on tools and equipment for rent in San Jose. Give us a call at (800) 286-6574.
-
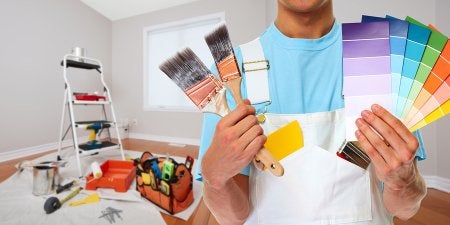
How to Prep Your Wall for Painting
If you walk into a beautifully remodeled, newly painted home, chances are you won’t think, “Wow, what a great prep job!” Prepping the walls is definitely not the most glamorous aspect of remodeling. But without the proper prep, the finished results won’t look nearly as spectacular. Take more time than you think you’ll need to prepare your walls before painting, and make sure you have the right rental equipment and tools on hand before getting started.
Protect the floor and furniture.
If you’re working in a small room, you might want to move all of the furniture out so you won’t trip over it. Otherwise, move all furniture to the center of the room, and cover it with plastic tarps. Cover the floor with canvas drop cloths. Protect the trim with painter’s tape, unless you’ll also be painting the trim.
Protect the hardware and light fixtures.
Remove the cover plates from the electrical outlets and light switches. Put the screws in a sealable bag so you don’t lose any of them. Cover the switches with painter’s tape. Next, use small plastic bags and painter’s tape to protect the doorknobs. Even if you aren’t painting the doors, droplets of paint may splatter on the hardware.
Scrape old paint and patch holes.
Check each wall carefully for flaking paint, and scrape it off with a putty knife. You don’t need to remove all of the existing paint—just the loose flakes. Then, use your putty knife to apply spackling paste to any holes in the wall. Smooth it with the putty knife and let it dry. Then, sand the repaired areas until they are perfectly smooth. Use a clean rag to wipe dust off the wall.
Apply primer to repaired areas.
Unless you’re painting directly on sheetrock, you won’t need to apply primer to the entire wall. Do apply primer to any areas you’ve repaired with spackling paste, however. Follow the directions on the product, and allow it to dry. Now, you’re ready to start painting!
Planning a major painting project this summer? Stop by A Tool Shed for the rental equipment you need at affordable prices. You can reach a friendly staff member at (800) 286-6574 if you have any questions about our available equipment rentals in San Jose.
-
Choosing the Right Size Ladder
Many homeowners make the mistake of using a ladder that’s too short for the job. This is because they often choose a ladder size that’s just a little longer than the height of the work area. Remember that the ladder will be at an angle, not straight up. Fortunately, if you’re opting for equipment rentals, you won’t end up making a pricey purchasing error, even if you initially pick a ladder that’s too short.
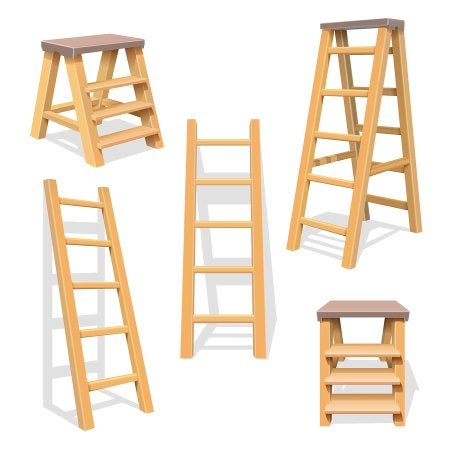
As a general rule of thumb, choose a ladder that is seven to 10 feet taller than the highest contact point for the ladder. The contact point might be the roof line or wall. When choosing a ladder rental, remember that the tallest point you can climb to is four rungs lower than the top. At the equipment rental store, you should check the ladder’s duty rating. This rating is the maximum amount of weight the ladder can safely support. Select a ladder with a duty rating sufficient to support both your weight and the weight of any rental tools and supplies you’ll be carrying up.
A Tool Shed offers high-quality equipment for rent in San Jose, including step and extension ladders. If you have any questions, you can reach us at (800) 286-6574.
-
Mixing Concrete by Hand
It isn’t difficult to mix concrete, especially if you rent the right tools for the job. Watch this featured video to see how one knowledgeable individual mixes concrete by hand for his projects around the house. He recommends that you wear gloves and a dust mask when working with concrete mix.
You’ll see him empty the bag of concrete into a wheelbarrow. He adds water periodically as he mixes the concrete with a garden hoe. Although this demonstrator is able to eyeball the amount of water he needs, it’s recommended that you measure the amount of water in accordance with the instructions on the concrete bag.
If you’re planning a project that involves mixing concrete , you’ll find all the equipment rentals you need in San Jose at A Tool Shed. Call us at (800) 286-6574, and ask us about our used tools for sale.
-
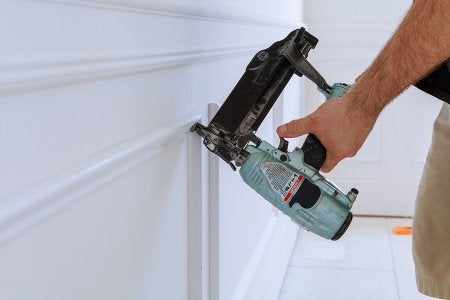
A Guide to Nail Gun Safety
Nail guns can make your household project much easier and quicker than using a manual hammer. However, it’s important to remember that this tool can also be risky if not used correctly. Tens of thousands of nail gun-related injuries are reported every year in the U.S. Take the time to educate yourself about the safe use of these tools, and you’ll be able to complete your project without any incidents.
Know your trigger.
Nail guns that feature bumps or automatic triggers, also known contact trip triggers, may result in unintentional and unsafe discharge of the tool. If they are available, you should instead choose a nail gun that features a single shot or full sequential trigger. Additionally, avoid keeping the trigger squeezed when you aren’t actively nailing.
Inspect the tools and lumber.
Lumber that features knots, nails, straps, or hangers can cause the fired nail to ricochet, which can result in a serious injury. Always check the lumber for potential problems before working on it. Additionally, double-check your tool for signs of damage, and avoid using a tool that may malfunction.
Wear personal protective equipment (PPE).
Safety gear isn’t a substitute for following safe usage guidelines for nail guns, but it can help lessen the effects of an accident. Always wear safety goggles or glasses rated for high-impact protection. Since nail guns can be noisy, you should also wear hearing protection. Wear work gloves too. These won’t stop a fired nail, but work gloves can prevent your grip from slipping.
Know when to use a hammer.
As convenient and powerful as nail guns are, they can’t be used for every single nailing job. There is an increased risk of injury when nail guns are used in awkward positions, as the recoil and the tool itself are more difficult to control. Nailing in close quarters, toe-nailing, and nailing above the height of your shoulders are examples of situations that call for an ordinary hammer.
A Tool Shed offers daily, weekly, and monthly tool rentals in San Jose, including everything you’ll need for your carpentry project. Ask us about our easy-to-use pneumatic nailer by top brand Porta-Nails! You can reach a friendly associate at (800) 286-6574.
-
Tips for Using a Floor Polisher
Floor polishers are ideal for restoring a beautiful, shiny appearance to a floor. Since most people don’t use floor polishers on a regular basis, these tools are typically rented instead. It can take a bit of practice to master the correct usage of this heavy, bulky equipment. Using the following tips will make it much easier for you to control the machine properly.
Clean the floor first.
Novices often assume that there’s no need to clean the floor before using a floor polisher. But actually, you should use a vacuum cleaner with strong suction to remove all debris and particles from the floor. Doing this before you turn on the floor polisher will make controlling this tool easier. Floor polishers aren’t able to remove debris from the floor, and so any particles left on it may cause scratches.

Get ready to use the polisher.
You should have a spray bottle with floor polish close at hand. If you have a work belt, you can attach it to that. Wear rugged work gloves for better handling of the equipment. Protect your feet by wearing closed-toed, sturdy shoes or work boots. Check the pad of the floor polisher. It should be clean, and there should be no bits missing. Adjust the handle to the proper height.
Start in the farthest corner.
You should start the machine at the farthest point away from the exit. Double-check that the power cord will reach all the way across the room, and then plug in the floor polisher. Apply floor polish directly to the pad or to the floor, depending on the instructions for the model you’re using.
Overlap your rows.
Turn the floor polisher on and guide it in a row across the room. Each time you start a new row, overlap the previous row by about one-third to ensure even coverage. Avoid walking on the areas you’ve already polished.
You can rent top-of-the-line floor polishers at A Tool Shed . We also offer used tools for sale in San Jose. To inquire about our current inventory, give us a call at (800) 286-6574.
-
Safety Equipment for Welders
When using any kind of tools, wearing the right safety gear is essential. For welders, safety equipment provides protection from sparks, heat, and the damaging bright light of the equipment.
Watch this video to learn more about the safety equipment you need if you rent a welder. Wearing clothing that protects your skin, including heat-resistant gloves, is important. You will also need the appropriate safety goggles to protect your eyes from the brightness and flying sparks.
For equipment rentals with fast delivery and reliable tools in San Jose, choose A Tool Shed . Our team can also explain the safety equipment you need to operate your rental equipment without injury. Find out more by calling us at (800) 286-6574.
-
Protect Your Ears Before Using Noisy Equipment
If you rent equipment for a job that generates loud noise, then protecting your ears is essential. Using noisy equipment without protect can cause lasting damage to your hearing that cannot be reversed. Investing in the right protection is the only way to avoid sacrificing your ears for your job.

There are multiple ways you can protect your ears from damage when you’re using noisy tools. Earplugs offer reliable protection without being intrusive. Select plugs that you can pop into each ear separately, or opt for corded plugs, that are attached by a thin cord that wraps around the back of your head. Another protect option is earmuffs. Earmuffs can have over-the-head or behind-the-head bands, or they can be attached to a hard hat.
When you rent equipment, don’t forget to use the necessary protection to keep yourself safe. At A Tool Shed, in addition to quality tools for rent and for sale, we offer an extensive selection of safety gear . To learn more, please call (800) 286-6574.
-
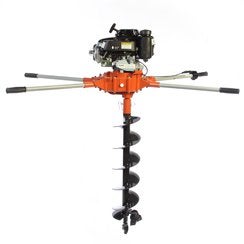
Your Step-by-Step Guide to Using a Power Auger
A power auger makes it easier to dig postholes, which makes it perfect for fence installations and other projects in which digging multiple holes is necessary. If you decide to add a power auger to your list of rental equipment for your project, here is what you need to know about getting the most out of it.
Get Permission
Before any project that requires digging, call your local utility companies to ensure that you won’t be digging in any areas that could jeopardize power, gas, or cable lines. Typically, these companies will come out and mark any lines in the area of your project so that you can be sure to avoid them. You may also need a building permit, depending on your local ordinances and homeowners association rules. In most cases, permits are required when installing fencing.
Dig in Pre-Marked Holes
Before you start digging, mark all of the places where you will be creating holes, and decide the depth you want to reach. With a partner, place the auger where you want to dig and switch on the engine. The auger’s handles will move counterclockwise, and you will need to counterbalance that by putting pressure in the opposite direction. It is important not to dig too deep and to clear dirt from auger as you go. You can either pull the auger up, turn it off, and empty the dirt into a pile by tilting the machine on its side, or you can pull the auger partly up while it is on to let the dirt fly out.
Clear the Holes
While you are using the power auger, stop frequently to clear out the holes. You may prefer to use a shovel to dig out excess dirt that is sliding down, so that you can stay in control of how much dirt is removed. Clearing the holes regularly will prevent the auger from becoming overloaded and too heavy to handle.
A Tool Shed has all of the equipment rentals in San Jose you need to get your DIY projects done. Whether you have a small home improvement project or are undertaking a large building job, contact us at (800) 286-6574 to arrange for your tool rental.
-
What to Consider When Purchasing Used Tools
Buying used tools is a good way to avoid repeated expenses for equipment rentals for items you use regularly. Buying used doesn’t have to mean that you compromise on quality or sacrifice functionality, however. You can find quality tools at a good price if you know what to look for when buying used. Keep this advice in mind as you weigh up your options for used tools.
Do Your Research
Before you start shopping, research the tools you are considering. Look into the reputation of different brands and which ones are known to be long-lasting and reliable. Shop around to get an idea of reasonable pricing for the items you’re considering. Get to know the different features of different models and brands that are on your short list. Keep in mind that certain features that you consider important may be not included on older models of tools, so know which features are must-have for you, so you can narrow down your selection.

Inspect Before You Select
Before you purchase used tools, inspect them thoroughly. The most important things to look for are signs of damage that could impact the safety or usability of the tool. For instance, frayed cords, taped cords, or motor vents with burn marks can all indicate that the tool doesn’t function safely. For motorized tools, turn them on and look for any signs of electrical issues or problems with the internal mechanism, such as smoke, sparks, or noises that seem too loud or inconsistent. Although replacement parts are easy to find for some tools, check to see if the tool you are considering has all of the pieces you will need. If it doesn’t, factor the cost of replacement pieces into the price.
Tread Carefully with Cordless Tools
Used cordless tools are highly sought-after, especially since they can be so costly when they are new. However, batteries for cordless tools have a shelf life and will eventually lose their ability to be recharged. New rechargeable batteries can be expensive, and it’s not usually possible to fully test a cordless tool battery before buying. To reduce the risk of any issues, stick to models that are no more than a few years old.
A Tool Shed offers a huge variety of used tools in San Jose that have been vetted by our team. To find out how to shop our selection of reliable used tools, please call (800) 286-6574.