-
How to Remove an Interior Wall
The process of removing an interior wall isn’t as complicated as you may think, as long as it is not load bearing. With the right tools and preparation, you can remove the wall in just a few steps. Be sure to gather the tools you will need before you begin, including any equipment rentals, so you don’t get stuck in the middle of the job. Follow these steps to fully remove an interior wall in your home.
Prepare the Wall
The first step is to prepare the wall for work. Start by shutting off the circuit breakers and removing all of the electrical plates and outlets. Shut off the water main if there are pipes in the wall. You will also need to remove any doors, trim, and baseboards that are on the wall. A flat bar is handy for removing the trim and baseboards. The last step in prepping the wall is to cut the paint and caulk between the wall and the ceiling. You should also make cuts between the wall and any adjacent walls you will not be removing. These cuts will prevent you from inadvertently removing drywall from the walls and ceiling you are leaving in place.
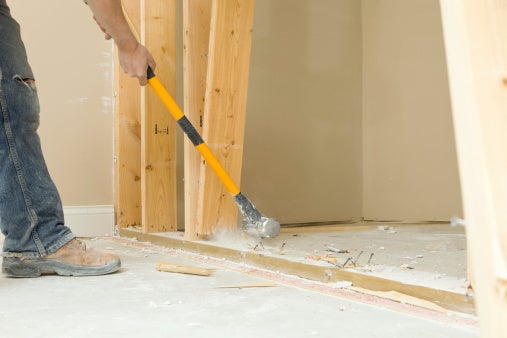
Cut into the Drywall
To start working on your drywall, first you have to punch holes in it using a framing hammer. Swing the hammer gently—it should easily break through the surface. If it doesn’t, then you are likely hitting a stud and need to move to a different portion of the wall. Next, use a reciprocating saw to cut the drywall. Remove it in sections until the drywall on both sides of the wall is completely gone.
Remove the Studs
The studs and beams should be clearly exposed now. Cut through each stud, and then slowly remove each one. Repeat the process until you have removed all of the studs and any leftover debris.
From framer hammers to reciprocating saws, A Tool Shed has all of the equipment rentals you need for every home improvement project. Call us today at (800) 286-6574 to rent tools in San Jose.
-
Spotlight on the Remote Control Trench Roller
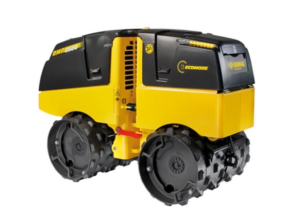
For compaction that is safer and more precise, consider adding a remote control trench roller to your list of equipment rentals. Remote control trench rollers have integrated safety features and the ability to deliver the maximum compaction results without loss of single in trench shoring. For large jobs, more than one trench roller can be used on the same site without the risk of interference. If you’re considering renting this equipment for your job, here is what you need to know.
Safe Remote Control Operation
Using a trench roller remotely increases operator safety, but concerns sometimes exist about the safety of allowing a powerful tool like this to move without manual operation. Fortunately, remote control trenchers require line-of-site control, so if the control box is out of the line of site of the equipment, it will no longer work. This means that it will be under observation at all times. Likewise, if the person who is controlling the trench roller comes within three feet of receiving eyes with the box, it will stop automatically, reducing the risk of collisions. The trench roller also monitors machine functions and provides alerts if there are any flaws, such as low oil levels or high engine temperatures, for safer and more efficient operation.
Superior Soil Compaction
Thanks to a low center of gravity and the ability to use both high and low compaction force, the compaction results are superior to manual trench rollers. Some trench rollers also have integrated compaction control systems that carefully monitor the level of compaction and provide an alert when the maximum level has been reached. The drums can be set to work at different widths based on the need of the job.
When you rent a remote control trench roller from A Tool Shed, you will need a midsized SUV, truck, or van if you have single access equipment trailer or at least a half-ton, full-sized vehicle for a dual axel trailer for safe towing. To find out more about renting equipment in San Jose from one of our seven locations, call (800) 286-6574.
-
See the Barreto Log Splitter in Action
A log splitter can be an invaluable tool for splitting firewood and breaking down lumber. It is a popular equipment rental item when winter is approaching and homeowners want to build up their supply of firewood for cool evening.
Watch this video to see the Barreto log splitter in action. It makes fast work of breaking down logs, making it easier than ever to have firewood or to split logs for other projects.
For Barreto sales and rentals in San Jose, choose A Tool Shed. We have seven locations across the area with a wide selection of equipment and tool rentals for all of your needs, as well as new and used equipment for sale. You can learn more by calling (800) 286-6574.
-
The Complete Guide to Polishing Your Car

If you want to keep your car looking as shiny as it did the day you drove it off the lot, then you have to polish it. Although car detailing companies do polishing as part of their services, you can do the same thing at home for much less by borrowing a polisher from an equipment rental company. Polishing your car once a year will keep it looking its best without compromising your paint job. Here is what you need to know to get the job done.
Wash and Rinse Your Car
Your car needs to be clean so that you can polish it. Choose a shaded area, and wash your car thoroughly. Rinse all of the soap off, but don’t dry it. It is best to wash your car by hand rather than running it through an automatic washer, which may not be as thorough and has a dry cycle.
Polish Panel by Panel
Before you start using the polisher, cover up any items nearby to protect them from spray from the tool. Be sure you are wearing clothing that can get dirty. Slightly dampen a polishing pod and apply it to the polisher. Put a polishing compound on one panel of your car—use enough of the compound to ensure that a moderate coating is in place. Turn the polisher onto medium speed and work on the panel, moving back and forth and being careful to avoid swirling or excessive pressure. Rinse the pad periodically to remove excess compound. Repeat the process on each panel of the car.
Wash and Wax
After you’re done polishing the car, wash it again, and this time, dry it completely. Wax the car using a foam wax pad, working the wax into the surface until there is only a haze left. Clean excess wax and polish from the windows using a microfiber cloth.
A Tool Shed offers car polishers among our large selection of equipment to rent in San Jose. To get your car looking as good as new, contact us today by calling (800) 286-6574 to reserve your tools at one of our seven area locations.